PosiTector SST Soluble Salt Testers - Online Instruction Manual
Table of Contents |
 |
The PosiTector Soluble Salt Tester (SST) is a hand-held electronic instrument that measures the conductivity of a solution and calculates the concentration of water-soluble salts on metal surfaces in accordance with ISO 8502-6 (the Bresle Method) and ISO 8502-9. It consists of a PosiTector body (Standard or Advanced) and an interchangeable probe.
The PosiTector SST is compatible with all Bresle Method-type patches including the Bresle Method DeFelsko PosiPatch, Bresle Method DeFelsko Patch and other adhesive patches. While compatible with any test patch, there are numerous advantages to the DeFelsko patch solutions.
The Bresle Method DeFelsko Patch is low cost, latex-free, and works on nearly any surface geometry or material. It features a low-tack adhesive which creates a tight seal while remaining easy to remove without leaving behind any foam residue.

The Bresle Method DeFelsko PosiPatch further simplifies the Bresle method. It requires no adhesive, as it is held to a steel surface by a magnetic holding ring. It has a built-in port which allows deionized (DI) water to be injected using a dull polypropylene dispensing tube, eliminating sharp needles from the test. It features a patented air-permeable membrane, which automatically releases trapped air as DI water is injected, then allows air bubbles to return and agitate the surface as solution is withdrawn. It is also reusable, and a single PosiPatch can be used for multiple tests.
The PosiTector SST can be used as a conventional conductivity meter making it ideal for testing abrasive materials in accordance with ISO 11127-6 and ASTM D4940-15. See Bresle Mode.
PosiTector SST Overview & Instructional Video (9 minutes)
The PosiTector SST powers-up when the center navigation button is pressed. To preserve battery life, the Gage powers down after approximately 5 minutes of no activity (15 minutes while in Bresle Mode). Alternatively, select Power Off from the menu. All settings are retained.
Gage functions are menu controlled. To access the Menu, power-up the gage, then press the center navigation button. Below is a sample menu for a PosiTector Advanced Model:
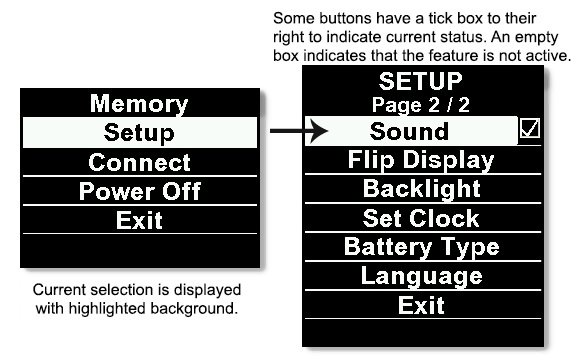
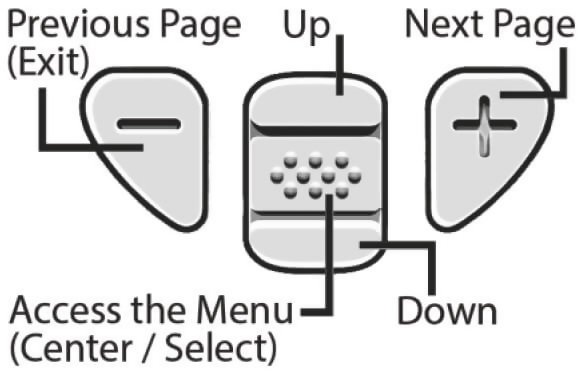
To navigate, use the Up and Down buttons to scroll vertically and ![]() to SELECT.
to SELECT.
Press the (+) button to switch pages in a multipage menu.
Press the (-) button to return to the previous menu or page.
Select Exit to exit from any menu.
When powered-up, the PosiTector automatically determines which probe is attached and does a self-check.
To disconnect a probe from a body, slide the plastic probe connector horizontally (in the direction of the arrow) away from the body. Reverse these steps to attach a different probe. It is not necessary to power-down the Gage when switching probes.
The PosiTector gage body accepts a wide variety of probe types including soluble salt, magnetic, eddy-current and ultrasonic coating thickness, surface profile, environmental, Shore hardness durometer and ultrasonic wall thickness probes. See www.defelsko.com/probes
PosiTector gage bodies accept all PosiTector SHD, 6000, 200,SPG, RTR, DPM and UTG probes easily converting from a shore hardness durometer to a coating thickness gage, surface profile gage, dew point meter or wall thickness gage
| PosiTector SST probes consist of a purpose-built test cell, optimized for the range, resolution and test volume of the Bresle Method. Conductivity measurements are compensated to 25°C (77°F) using a built-in temperature sensor, and the sample temperature is recorded for each measurement. The probe can be used as a conventional conductivity meter by unchecking Bresle Mode. | 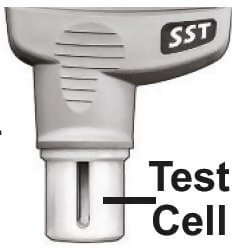 |
Test Preparation:
Use deionized (DI) water to thoroughly clean the PosiTector SST test cell, test cup, syringe and PosiPatch (if used in test).
All test materials should be handled in a manner that minimizes the potential for contamination. The PosiTector SST operator may choose to wear nitrile or other non-contaminating gloves when performing the test.
Remove the protective rubber cap from the probe. Power-up the Gage by pressing the center navigation ![]() button. In the default Bresle Mode, the Gage guides you through three simple steps [1], [2] and [3].
button. In the default Bresle Mode, the Gage guides you through three simple steps [1], [2] and [3].
Step [1]: Obtain Background (Blank) Conductivity Measurement (?1)
NOTE: The Gage automatically displays the previous background measurement, if any. This measurement can be reused and steps (c) to ( e) can be skipped by pressing the (-) button.
- Pour at least 4ml (milliliters) of deionized (DI) water into the supplied cup (to prevent contamination of the water source).
- Fill the syringe completely with DI water from the cup (slightly more than 3ml).
- Completely fill the PosiTector SST probe’s test cell with water from the syringe (approximately 1ml).
- Wait until the measurement stabilizes (up to 5 seconds), then press the (+) button to save a new background conductivity measurement ( ?1) and the water temperature (T1).
- Use the syringe to draw all of the water from the test cell. Shake any remaining water out of the test cell.
- With the syringe pointing up, expel the air and excess solution from the syringe until there is 3ml of DI water remaining.
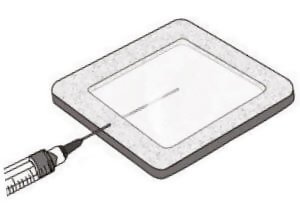
Step [2]: Prepare Bresle Method Patch
Option A: DeFelsko PosiPatch
- Turn the PosiPatch and magnetic ring upside down. Place the PosiPatch into the magnetic ring ensuring the arrows align with the injection port. Do not touch the PosiPatch’s interior.
- Carefully place the magnetic ring on the steel surface. When used on vertical surfaces, position the port between the 2 o’clock and 10 o’clock points before attaching the ring to the surface.
- Slowly inject 3.0ml of DI water into the port using the plastic dispensing tip. The air within the PosiPatch automatically escapes through the air-permeable membrane.
| A | B | C |
 |
||
When used on horizontal surfaces, fully insert the dispensing tip into the PosiPatch. On vertical surfaces, insert the dispensing tip only as far as is needed to see the tip inside the PosiPatch.
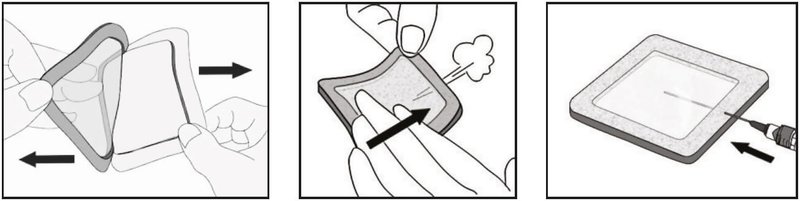
Option B: Bresle Method DeFelsko Patch (or equivalent)
- Remove the backing and foam center from the patch, taking care not to touch the interior surface.
- Press the patch firmly onto the surface making sure most of the air escapes.
- Pierce the top of the patch at the foam perimeter, allowing the needle to penetrate into the center of the patch.
| A | B | C |
 |
||
- Inject half of the water into the patch. Then, use the syringe to withdraw trapped air.
- Remove the needle, point it upwards and expel the air.
- Re-insert the needle and inject the remaining water into the patch.
Step [3]: Begin Test (applies to both patch styles)
- Once the water is injected into either patch, press the (+) button to start the test timer.
- TIP: After starting the test timer, the operator can select Power Off from the Gage menu to conserve battery life. The test timer will continue to run and the elapsed test time will be displayed when the Gage is powered-up.
- Without removing the needle/dispensing tip from the patch, use the syringe to repeatedly withdraw and inject the water. ISO 8502-6 recommends this process be completed at least four times and that the test time be agreed between interested parties.
- After the desired amount of time has elapsed, withdraw the solution from the patch.
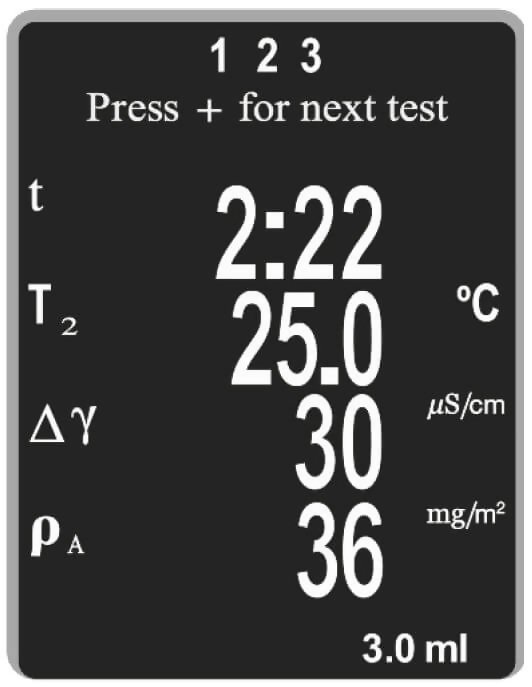
- To complete the measurement, completely fill the PosiTector SST probe’s test cell with the solution from the patch. Wait until the measurement stabilizes (up to 5 seconds), then press the (+) button to save the temperature (T2) and conductivity (?2) of the solution. ??, the difference between the ?2 soluble salt reading and the ?1 background reading, is displayed.
 |
|
- Press the (+) button to begin a new test.
The Bresle Method DeFelsko Patch peels off the surface easier and with less residue than conventional Bresle patches. Remove it immediately after the test and dispose.
The Bresle Method PosiPatch lifts cleanly off the surface, with absolutely no residue. The user may choose to discard the PosiPatch and begin the next test with a new one, or simply rinse it with DI water and reuse for several more tests until worn.
- Rinse the test cell with unused DI water several times after each measurement, shaking the water out after each rinse.
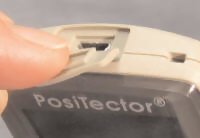
- Protective Cap
- PosiTector SST probe is shipped with a protective cap over the probe. Remove this cap prior to use. Replace the cap to protect the indentor and presser foot when not in use.
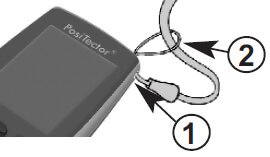
- Wrist Strap
- We recommend attaching and wearing the supplied wrist strap.
Plastic Lens Shield
The Gage display lens is covered with a thin plastic film for protection against fingerprints and other marks during shipment. This film, while usually removed before using the instrument, can be left in place if desired. Replacements can be purchased.
Certification
All PosiTector SST probe includes a Certificate of Calibration. For organizations with re-certification requirements, instruments may be returned at regular intervals for calibration. DeFelsko recommends that customers establish calibration intervals based upon their own experience and work environment.
Based on our product knowledge, data and customer feedback, a one year calibration interval from either the date of calibration, date of purchase, or date of receipt is a typical starting point. Written calibration procedures are available from DeFelsko Corporation at no charge. See: www.defelsko.com/quality/calibration_procedures.htm
Before the application of protective coatings, steel substrates must be carefully cleaned. The surface should then be tested to determine if the level of salt contamination is acceptable or not.
Soluble salts are not visible to the naked eye. If allowed to remain on the substrate in sufficient quantities, they can draw moisture through the coating and cause premature coating failure from osmotic blistering or disbondment.
The test for water-soluble salts is performed in accordance with ISO 8502-9. As a part of that method, the extraction of soluble salt contaminants for analysis is performed in accordance with ISO 8502-6, commonly known as the Bresle Method.
Put simply, the Bresle Method involves placing a volume of water in a chamber against the steel surface. This water dissolves soluble salts present on the surface, raising the conductivity of the water. The measured increase in conductivity establishes the concentration of soluble salts.
![]() Calibration & Verification of Accuracy
Calibration & Verification of Accuracy![]()
Three steps ensure best accuracy
- Calibration - typically performed by the manufacturer. All probes include a Certificate of Calibration.
- Verification of Accuracy - typically performed by the user by measuring known reference standards such as the supplied conductivity standard.
- Adjustment - to a known conductivity standard
- Calibration
- Calibration is the high-level, controlled and documented process of measuring traceable calibration standards over the full operating range of the probe, and verifying that the results are within the stated accuracy of the probe. Calibrations are performed by the manufacturer, their authorized agent, or by an accredited calibration laboratory in a controlled environment using a documented process.
- Verification
- Verification is an accuracy check performed by the user with a solution of known conductivity. To perform a verification, ensure that the conductivity standard and instrument are at the same temperature. Remove any remaining DI water in the test cell by filling it with the conductivity standard, then inverting the test cell to empty it. Fill the test cell with the conductivity standard again. If the reading is not within the combined tolerance of the gage and conductivity standard, proceed to Cleaning the Test Cell, below.
NOTE: Always use fresh or new conductivity standard. The solution expiry date indicated on each bottle is valid only if the bottle is unopened. A good rule of thumb is to discard the solution one month after the bottle has been opened.
Cleaning the Test Cell – If the Verification reading is outside the combined accuracy of the conductivity standard and gage, the probe may need to be cleaned by filling it with DI water and rubbing the walls of the cell with a supplied foam tip swab. Rinse with DI water several times before using the cell.
- Adjustment
- Adjustment, or Calibration Adjustment, is the act of aligning the Gage’s readings to match that of a known conductivity standard. See Cal Adjust.
Allows the operator to change the displayed units for both Temperature (°C or °F) and Surface Density (mg/m2or µg/cm2).
Reset (menu Reset) restores factory settings and returns the Gage to a known condition. The following occurs:
- All batches, stored measurements, batch names and screen captures are erased.
- Calibration adjustments are returned to factory settings.
- The last stored background measurement (? 1) is erased.
- Menu settings are returned to the following:
- Memory = OFF
- Bresle Mode = ON
- Auto Dim = ON
- Display = None
- Patch Volume = 3.0ml
- Bluetooth & Stream = OFF
- WiFi & Access Point = OFF
- Surface Density units = mg/m2
- Temperature units = °C
- Hi Res = OFF
Perform a more thorough Hard Reset as follows:
1. Power down the Gage and wait 5 seconds.
2. Simultaneously press and hold the (+) and ![]() center buttons until the Reset symbol
center buttons until the Reset symbol ![]() appears.
appears.
This returns the Gage to a known, “out-of-the-box” condition.
It performs the same function as a menu Reset with the addition of:
- Bluetooth Pairing info is cleared.
- Menu settings are returned to the following status:
- Flip Display = Normal
- Backlight = Normal
- Auto Sync .net = ON
- White on Black = ON
- Sound = ON
- Language = English
- Battery Type = Alkaline
- Bluetooth Smart = OFF
- USB Drive = ON
NOTE: Date, Time and WiFi settings are not affected by either Reset.
Displays the model number & serial number, probe type & serial number, PosiSoft.net registration key, the amount of remaining memory for storage of readings, date and time, and software packages.
For security purposes, the registration key is required to add the Gage to your free PosiSoft.net account.
![]() Cal Adjust (Calibration Adjustment)
Cal Adjust (Calibration Adjustment)![]()
The PosiTector SST can be adjusted to a known conductivity standard. Use the (-)(+) buttons to decrease/increase the displayed value to match the known conductivity of the standard.
NOTE: In typical use, a calibration adjustment should not be required. Before performing the adjustment, ensure that the PosiTector SST test cell has been thoroughly cleaned with DI water. Ensure that the conductivity standard and PosiTector SST test cell are at the same temperature.
Set the volume of water being used for the test (3.0ml default). Use the (-)(+) buttons to decrease/increase the displayed value. The patch volume is used to calculate surface density.
Increases the displayed Gage resolution as follows:
0.1 µS, 0 – 200 µS/cm
NOTE: Gage accuracy is not affected.
When checked (default), the Gage guides the user through a 3-step test process in accordance with ISO 8502-6. Uncheck Bresle Mode to use the PosiTector SST as a regular conductivity meter such as when testing abrasive materials in accordance with ISO 11127-6 and ASTM D4940-15.
White on Black ![]() (Advanced models only)
(Advanced models only)
Inverses the LCD display to black on a white background to provide better readability in some surroundings.
Sound ![]() : Toggle the Gage sounds ON (checked) or OFF (unchecked).
: Toggle the Gage sounds ON (checked) or OFF (unchecked).
Flip Display: This option causes the display to read upside down. Ideal for use overhead with the resultant display conveniently pointed toward the operator.
Backlight: Selects display brightness (Sun, Normal or Night). All settings will dim slightly after a period of no activity to conserve battery life. Press the Down button to brighten the display.
Set Clock: All batches are date-stamped when created, and all readings are time-stamped (24 hour format) when stored into memory. It is therefore important to keep both the date and time current using this menu option. Use the Up and Down buttons to scroll, and the (-) and (+) buttons to adjust a value. The instrument’s data and time can also be viewed in Info.
Language: Converts displayed and printed words to the selected language.
Battery Type: Selects the type of batteries used in the Gage from a choice of “Alkaline”, “Lithium” or “NiMH” (nickel-metal hydride rechargeable). If “NiMH” is selected, the Gage will trickle charge the batteries while connected via USB to a PC or optional AC power supply (USBAC). The battery state indicator symbol is calibrated for the selected battery type. No damage will occur if the battery type used in the Gage does not match the selected battery type.
The PosiTector SST has internal memory storage for recording measurement data. Stored measurements can be reviewed on- screen or accessed via computers, tablets and smart phones. All stored measurements are date and time-stamped.
The ![]() symbol appears and basic statistics are displayed when the Gage is set to store measurement data.
symbol appears and basic statistics are displayed when the Gage is set to store measurement data.
Press both (-) (+) buttons at any time to capture and save an image copy of the current display.
The last 10 screen captures are stored in memory and can be accessed when connected to a computer (see PosiSoft USB Drive).
Standard models:
- - Store up to 250 readings in one batch.
- The following appears within the Memory menu:
- On: turns memory on and begins recording
- Off: stops recording (stored readings remain in memory)
- Clear: removes all readings from memory
View: lists group statistics and all stored readings on the display. It will begin by showing statistics based on all readings in memory. Use the Up and Down buttons to scroll through all readings. Press ![]() to exit.
to exit.
Advanced models:
- Store 100,000 readings in up to 1,000 batches (groups).
- The following appears within the Memory menu:
New Batch
Closes any currently opened batch and creates a new batch name using the lowest available number. For example, if only Batch 1 and Batch 3 exist, then Batch 2 would be created and made the current batch. Each measurement will be displayed and stored into this new batch. New batch names are date stamped at the time they are created.
NOTE: Calibration adjustments cannot be made if readings are stored in memory.
- Open: Select a previously created batch name to open and make current. If it contains measurements, on-screen statistics will immediately reflect values calculated from this batch. The calibration setting (i.e. Cal 2) associated with this batch is also opened.
- Close: Stops the recording process, closes the current batch and removes the statistics from the display.
- Delete: Remove a batch completely from memory. The name is deleted and all measurements are erased.
- View: Scroll using the Up or Down buttons through information, statistical summary, and a list of each reading in the currently opened batch. Press
 to exit.
![]() Annotate (Advanced models only)
Annotate (Advanced models only)![]()
Create meaningful batch names and enter notes directly on the instrument using a familiar onscreen QWERTY keyboard. Use the Gages navigation and (-)(+) buttons to enter annotations. Annotations can be synchronized with PosiSoft.net and are included in PosiSoft USB Drive reports.
Sends a statistical summary and individual measurements to the optional Bluetooth wireless printer.
NOTE: To cancel printing, press and hold the (-) and (+) buttons simultaneously.
Display (appears only if a batch is currently open)
- The default display mode shows a statistical summary. Press the Up navigation button to display other modes:
- The following user selectable display options are available:
- Chart: Displays a live graph of measurements data
- Notes: Displays a batch note (see Annotate)
- None: default screen showing statistics information when a batch is open.
- The following user selectable display options are available:
Batch Summary: Displays a summary of all stored batches including the name, probe type, number of readings and type.
The PosiTector can be connected to a computer using the included USB cable or Bluetooth wireless technology. The USB connection has the following capabilities:
- Download readings via PosiSoft USB Drive
- Download readings and batch notes to PosiSoft software solutions
- Update the instrument firmware
- Supply power to the instrument for extended use, or recharge optional rechargeable batteries
The USB port resides on the top of the instrument, behind a rubber flap.
![]() Accessing Stored Measurement Data
Accessing Stored Measurement Data![]()
DeFelsko offers the following free solutions for viewing, analyzing and reporting data:
PosiSoft USB Drive - Connect the Gage to a PC/Mac using the supplied USB cable. View and print readings and graphs using universal PC/Mac web browsers or file explorers. No software or internet connection required. USB Drive must be selected in the Gage’s “Connect > USB” menu.
PosiSoft Desktop - Powerful desktop software (PC/Mac) for downloading, viewing, printing and storing measurement data. Includes a customizable, templated PDF Report Generator. No internet connection required.
PosiSoft.net - Web-based application offering secure, centralized storage of measurement data. Access your data from any web-connected device.
PosiTector App - (Advanced models only, serial numbers 784000+) App for compatible iOS and Android smart devices. Permits users to create, save and share professional PDF reports. Add images and notes using the smart device’s camera and keyboard.
For more information on our PosiSoft solutions, see: www.defelsko.com/posisoft
![]() PDM - PosiSoft Desktop Manager
PDM - PosiSoft Desktop Manager![]()
PDM - PosiSoft Desktop Manager is a Windows-based utility application which allows automatic two-way communication (synchronization) between USB connected PosiTector/PosiTest AT-A instruments and PosiSoft.net.
Additionally, PDM allows the PosiTector and PosiTest AT-A to communicate with our online update server to ensure your gage is always up-to-date with the latest features. See Updates - www.defelsko.com/update
NOTE: When installed, PDM runs as a start-up application and resides in the Windows notification area (system tray) of a PC. PDM does not download (import) measurements from your gage and does not have any reporting capabilities.
Allows connection to your local wireless network or mobile hot spot. Ideal for using your network’s internet connection for synchronizing stored measurements with PosiSoft.net. See www.defelsko.com/wifi
Enabled ![]() :
Turns WiFi functionality ON. When selected, the
:
Turns WiFi functionality ON. When selected, the ![]() icon will appear on the display. To deactivate WiFi, uncheck the Enabled box.
icon will appear on the display. To deactivate WiFi, uncheck the Enabled box.
Access Point![]() :
:
- Connect your smart device/computer to a PosiTector Advanced body wirelessly without the need for a separate network. Wirelessly import readings into legacy PosiSoft 3.0 Desktop Software or whenever a WiFi network is not available or out-of-range.
- To enable, select Access Point from the Connect > WiFi menu. The Access Point icon will display in the upper left of the PosiTector display.
Securing your Access Point -
- To ensure the PosiTector is only accessible to authorized devices, it is important that you enter a passphrase (password) for the Access Point. The default Passphrase is password.
- In the Connect > WiFi > Setup menu, select AP Passphrase.
- Press button to display on-screen keyboard. Enter a Passphrase for the Access Point. The Passphrase will be required for all devices connecting to the PosiTectors Access Point.
- The PosiTector is now visible to all WiFi enabled devices. Simply connect your devices WiFi to the new PosiTector Access point. All PosiTectors are uniquely identified by their respective gage body serial numbers.
AP Channel - Default Channel: 6
- For most users the default channel will not have to be altered. If you are experiencing poor connection or are unable to connect, try another channel.
- In the Connect > WiFi > Setup menu, select AP Channel.
- Press the UP center navigation button to highlight the channel. Use the (-) or (+) buttons to change the channel. Press the DOWN navigation button and select OK. Press the button.
Networks:
- With WiFi Enabled the Gage will allow the user to add a new network and will automatically check for available local networks. Available networks detected by the Gage are listed on the screen along with any networks that the Gage has previously been connected to that are not currently within connection range.
Information:
- Gage displays information about the local WiFi network connection including.
- SSID: the network’s name
- State: displays if the Gage is connected to the network or not
- IP Address: the network’s IP Address. Users can enter this number into a web-browser of any WiFi enabled device that is connected to the same network in order to view the Gage’s synced batches.
Setup:
- Allows user to setup a WiFi connection
- IP Settings: enter the IP information as follows: IP Type (DHCP or Static), IP Address, Gateway, Netmask, DNS1, DNS2
- Server Enable: enables a connection between the network and the Gage.
- Gage Name: enter a name for the Gage (up to 14 Characters).
- AP Channel: (Default Channel: 6) The access point channel corresponding to a frequency range.
- AP Passphrase: (Default Passphrase: password) A series of characters, numbers or symbols used to log on to a WiFi network.
- WiFi Reset: erases all WiFi settings.
When USB Drive is checked ![]() , the PosiTector gage uses a USB mass storage device class which provides users with a simple interface to retrieve stored data in a manner similar to USB flash drives, digital cameras and digital audio players.
, the PosiTector gage uses a USB mass storage device class which provides users with a simple interface to retrieve stored data in a manner similar to USB flash drives, digital cameras and digital audio players.
USB Drive is also required to import stored measurements into PosiSoft Desktop software. Once connected, any computer can view measurements stored in memory by navigating a virtual drive labeled "PosiTector” using the included USB cable.
A formatted HTML report is viewed by selecting the "index.html" or “START_HERE.html” file found in the root directory. Optionally, text ".txt" files located in each batch folder provide access to measurement values. Stored datasets and graphs can be viewed or copied using universal PC/Mac web browsers or file explorers.
When your PosiTector is first connected to your Windows PC via a USB cable, an enumeration process is started that installs device drivers without re-booting your computer. You may see several pop-up windows in the taskbar at the bottom right of your screen. Wait for the entire process to be completed before proceeding.
Retrieving stored screen captures:
The last 10 screen captures stored in memory can be accessed by navigating to the “screen capture” directory within the “PosiTector” virtual drive.
NOTE: When connected, power is supplied through the USB cable. The batteries are not used and the body will not automatically power down. If rechargeable (NiMH) batteries are installed, the instrument will trickle charge the batteries.
The WiFi, USB and Bluetooth menus contain a Sync .net Now option. When selected, the Gage immediately synchronizes stored measurement data via its respective communication method (internet connection required).
Alternatively, select Auto Sync .net from within the USB connect menu to automatically synchronize upon connection to a PC. Additional measurements added to memory while connected are synchronized only when the USB cable is disconnected and reconnected, or when the Sync .net Now option is selected.
WiFi connected gages automatically attempt synchronization upon power-up.
NOTE: PosiSoft Desktop Manager is required when using USB or Bluetooth connections to synchronize measurements with PosiSoft.net.
![]() Bluetooth Smart (Advanced models only, serial numbers 784000 and greater)
Bluetooth Smart (Advanced models only, serial numbers 784000 and greater) ![]()
![]()
When Enabled ![]() , allows communication with a smart device running the PosiTector App via auto-pairing Bluetooth Smart (BLE) wireless technology.
, allows communication with a smart device running the PosiTector App via auto-pairing Bluetooth Smart (BLE) wireless technology.
Select ![]() batches to flag them for synchronization to the PosiTector App. New batches created while Bluetooth Smart is enabled are automatically selected.
batches to flag them for synchronization to the PosiTector App. New batches created while Bluetooth Smart is enabled are automatically selected.
Sync Batches
With Bluetooth Smart enabled, select Sync Batches to transfer selected ![]() batches to the PosiTector App. This is useful when switching between smart devices, as only readings and batches that have yet to be synchronized with any smart device are synchronized automatically.
batches to the PosiTector App. This is useful when switching between smart devices, as only readings and batches that have yet to be synchronized with any smart device are synchronized automatically.
NOTE: If Bluetooth Smart is disabled, data from batches selected in the Sync Batches menu are held in a queue until communication with the PosiTector App is re-established.
Send Batches
Transfers selected ![]() batches to the PosiTector App (useful when switching between devices).
batches to the PosiTector App (useful when switching between devices).
The Send Batches option is visible in the Bluetooth Smart menu when the Gage is connected to a smart device running the PosiTector App.
![]() Bluetooth (Advanced models only)
Bluetooth (Advanced models only)![]()
![]()
Allows individual readings to be sent to a computer, printer or compatible device as they are taken using Bluetooth wireless technology. See www.defelsko.com/bluetooth
PosiTector Advanced models have Bluetooth functionality to:
Communicate with the PosiTector Desktop Manager (PDM) in lieu of a USB cable.
Stream individual readings to a computer or Bluetooth wireless printer as they are taken.
Print to the optional battery powered Bluetooth wireless printer.
Enabled ![]() : Turns Bluetooth functionality ON. When selected, the
: Turns Bluetooth functionality ON. When selected, the ![]() icon will appear on the display. To deactivate Bluetooth, uncheck the Enabled box.
icon will appear on the display. To deactivate Bluetooth, uncheck the Enabled box.
Pairing: The instrument and receiving device must be paired before stored or streamed datasets can be transmitted. For pairing instructions, see http://www.defelsko.com/bluetooth
Info: Lists information about your current Bluetooth connection, including the currently paired device and MAC address.
Stream: When checked, the instrument will stream datasets to the paired Bluetooth Device as they are taken. Datasets can be streamed as they are taken to the optional Bluetooth printer or third-party computer software.
Powder Probes: Displays menu options that enable the PosiTector body to communicate with wireless PosiTector PC probes. See http://www.defelsko.com/pc

PosiTector Advanced models can output to the optional battery powered Bluetooth wireless printer one of two ways:
Stream individual readings as they are taken.
Print stored batch readings and summaries
Begin by entering the Connect > Bluetooth menu. Turn Bluetooth ON and “Pair” the PosiTector to the printer. See: www.defelsko.com/bluetooth
Streaming: In the Connect > Bluetooth menu, select the “Stream” tick box. All readings will now be simultaneously displayed on the LCD and sent to the printer.
Printing: In the Memory menu, select Print.
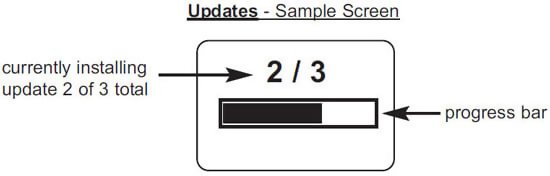
Determine if a software update is available for your Gage. See www.defelsko.com/update
To perform an update the Gage must be connected to an internet connected PC with PosiSoft Desktop Manager or WiFi network.
WARNING: Ensure that stored measurements are backed up to a PC or PosiSoft.net.
The Gage will perform a Hard Reset after an update. All stored measurements will be erased from memory.
![]() DO NOT unplug the gage during the update operation.
DO NOT unplug the gage during the update operation.
![]() Power Supply / Battery Indicator
Power Supply / Battery Indicator![]()
Power Source: 3 AAA alkaline, Lithium or optional Nickel-metal hydride (NiMH) rechargeable batteries. For best battery indicator results, ensure the appropriate Battery Type is selected in the Setup > Battery Type menu.
The battery indicator ![]() displays a full bar with fresh alkaline or fully charged batteries installed. As the batteries weaken, the bar will be reduced. When the battery symbol is low
displays a full bar with fresh alkaline or fully charged batteries installed. As the batteries weaken, the bar will be reduced. When the battery symbol is low ![]() the instrument can still be used, but the batteries should be changed or recharged at the earliest opportunity. The instrument will turn off automatically when batteries are very low, preceded by a Low Battery Warning on the display.
the instrument can still be used, but the batteries should be changed or recharged at the earliest opportunity. The instrument will turn off automatically when batteries are very low, preceded by a Low Battery Warning on the display.
![]() To retain all user settings and stored memory readings, only replace the batteries after the instrument has powered-down. Battery performance decreases at low temperatures.
To retain all user settings and stored memory readings, only replace the batteries after the instrument has powered-down. Battery performance decreases at low temperatures.
Rechargeable Batteries (available option)
DeFelsko recommends the use of eneloop (NiMH) rechargeable batteries. They combine the advantages of rechargeable batteries and disposable (Alkaline) batteries. They discharge very slowly and can be stored for long periods without having self discharge concerns. (See www.eneloop.info)
Most conditions can be cleared with a Hard Reset. If not, visit our Service & Support page for information on sending your instrument to us for a no charge evaluation. See: www.defelsko.com/service
- Measuring Range: 0-500 µS/cm, 0-2000 mg/m2, 0.0-200.0 ug/cm2
- Resolution: 1 µS/cm, 1 mg/m2, 0.1 ug/cm2
- Accuracy: + 2 µS/cm (0-200 µS/cm), + 10 µS/cm (0-201-500 µS/cm)
- Gage Size:
- 165 x 61 x 28 mm
- 6.5” x 2.4” x 1.1”
- Weight: (without batteries)
- 140 g
- 4.9 oz.
- Temperature Range:
- 0 to +50° C
- +32° to +122° F
- Normalization Temperature:
- 25° C
- 77° F
- Test Cell Volume: 1 ml
This device complies with part 15 of the FCC Rules. Operation is subject to the following two conditions: (1) This device may not cause harmful interference, and (2) this device must accept any interference received, including interference that may cause undesired operation.
Before returning the Gage for service
- Install new or newly recharged batteries in the proper alignment as shown within battery compartment.
- Examine the probe for damage. Use the supplied cleaning tool to clear dirt or debris from the test cell.
- Perform a Hard Reset.
- If issue is not resolved, Update your PosiTector gage body and re-attempt measurements.
IMPORTANT:
If you must return the Gage for service, please fill out and include the Service Form located at www.defelsko.com/support with the Gage. Be sure to also include the probe, your company name, company contact, telephone number and fax number or email address.